 |
| CEntrance Mic Port Pro 2 |
I saw MicPort Pro 2 ($279.95) and wanted to check it out because things have changed since 2012. Smart phones have gotten smarter and there are more apps. Last year, in 2019, I ordered my iPhone 11 Pro Max with 512 GB of memory. Not because I knew what it would be used for, but just because. You know how that is, right? Expect change. I took all of the pictures in this review with the iPhone 11.
As 2020 has progressed, because of COVID-19, my narration clients have been asking about recording at home. They had been able to get by with any gear for auditions, but were being asked if they could provide high quality finished tracks. My clients are not highly technical people, but at the same time, they had been around microphones, computers and audio interfaces for a while. Cheap mics, cheap interfaces and bad acoustical environments can be noisy. How much bad audio will their clients accept? There are some wonderful de-noise software solutions, but that’s just one more step to add to the workflow. Their clients didn't want to add clean up to their work flow.
The question became, how could they record audio with a good microphone as a 24-bit .WAV file for auditions as well as for real work? There are three major consideration -- quiet mic, quiet interface and nice room acoustics. Any variation from these and you have a problem. I’m happy to report that CEntrance’s MicPort Pro 2 is a quiet, well-featured way to record tracks into a desktop, laptop or (in my case) iPhone 11 Pro Max.
 |
| CEntrance Mic Port Pro 2 XLR Input |
While there are USB mics all ready to hit a variety of your USB ports, maybe you have an XLR mic that fits your voice better. Maybe you'd like to record with other mics for instruments. Maybe you want to plug in your guitar pickup, electric bass or Theremin. Maybe you want to take a feed from a mixer and the only connector you have at the moment has a 1/4" plug.
Top To Bottom |
| CEntrance Mic Port Pro Front Panel |
Let's check out the main controls from top to bottom. That small switch in the upper left-hand corner labelled Hi-Z is normally switched off, to the left. You'd move it by using something like a bent paperclip to nudge the switch to the right if you wanted to plug in a high impedance (Hi-Z) device like most electric guitars or basses, provided they have standard high impedance outputs.
But WAIT!! CEntrance even includes a little metal thingee taped to the inside of the box to use on the switches. They think of EVERYTHING!
 |
| Switch Thingee |
You can't hurt the MicPort Pro 2 by having that switch in the wrong position, but the audio may sound wonky. The upper right-hand corner is labelled HPF. That's a High Pass Filter. It passes the high frequencies, but blocks the low frequencies.Maybe you're outside and the wind is a problem, maybe the microphone you're using is too bassy, you can't get the 47 pedals on your pedal board working right, you can roll off some of the low end with the High Pass Filter. It's pretty tame, but it will make a difference.

The top knob is for Input GAIN adjustment. The Shure SM 58 and Sennheiser MD 421 mics I tested are Dynamic Mics. They're great mics, but they are not as sensitive as condenser mics, To get them to the right level for voice work, I had the GAIN knob almost all the way up. For the Neumann TLM 103 I tested, I had the GAIN control up to about 2PM, or just over half way. Th
There are two LED lights to the left of the GAIN knob. The yellow one indicates that the MicPort Pro 2 is receiving signal from the mic. The red one is a peak flasher and lights when the signal goes above -6 dB. That's a warning light, but it's also very functional. The best use of it is to adjust the GAIN knob so your voice (or other audio source) makes that red light flicker just a little. That means your audio level is not distorted, but isn't too low. The sweet spot!
The middle knob, IN_USB, is for adjusting the balance between the audio coming in to the MicPort Pro 2 with the audio coming back out of your recording device. That's very important if you are stacking tracks and need to hear what's already been recorded. Because of the circuitry that audio went through, it will be heard slightly later than the input. That's called latency and if you're doing VO and hearing yourself directly as well as from the recording device in real time, the sound in your headphones will be a little weird. If it's too disturbing and you're just tracking your voice, turn the IN_USB knob full counter-clockwise. Then turn it counter-clockwise to hear playback.
The third knob, MONITOR allows you to vary the volume in your headphones. I tried Sony MDR 7506 and cushier Audio-Technica ATH-M50 and found the headphone output of the Mic Port Pro could be raised to uncomfortably LOUD levels. Plenty of gain.
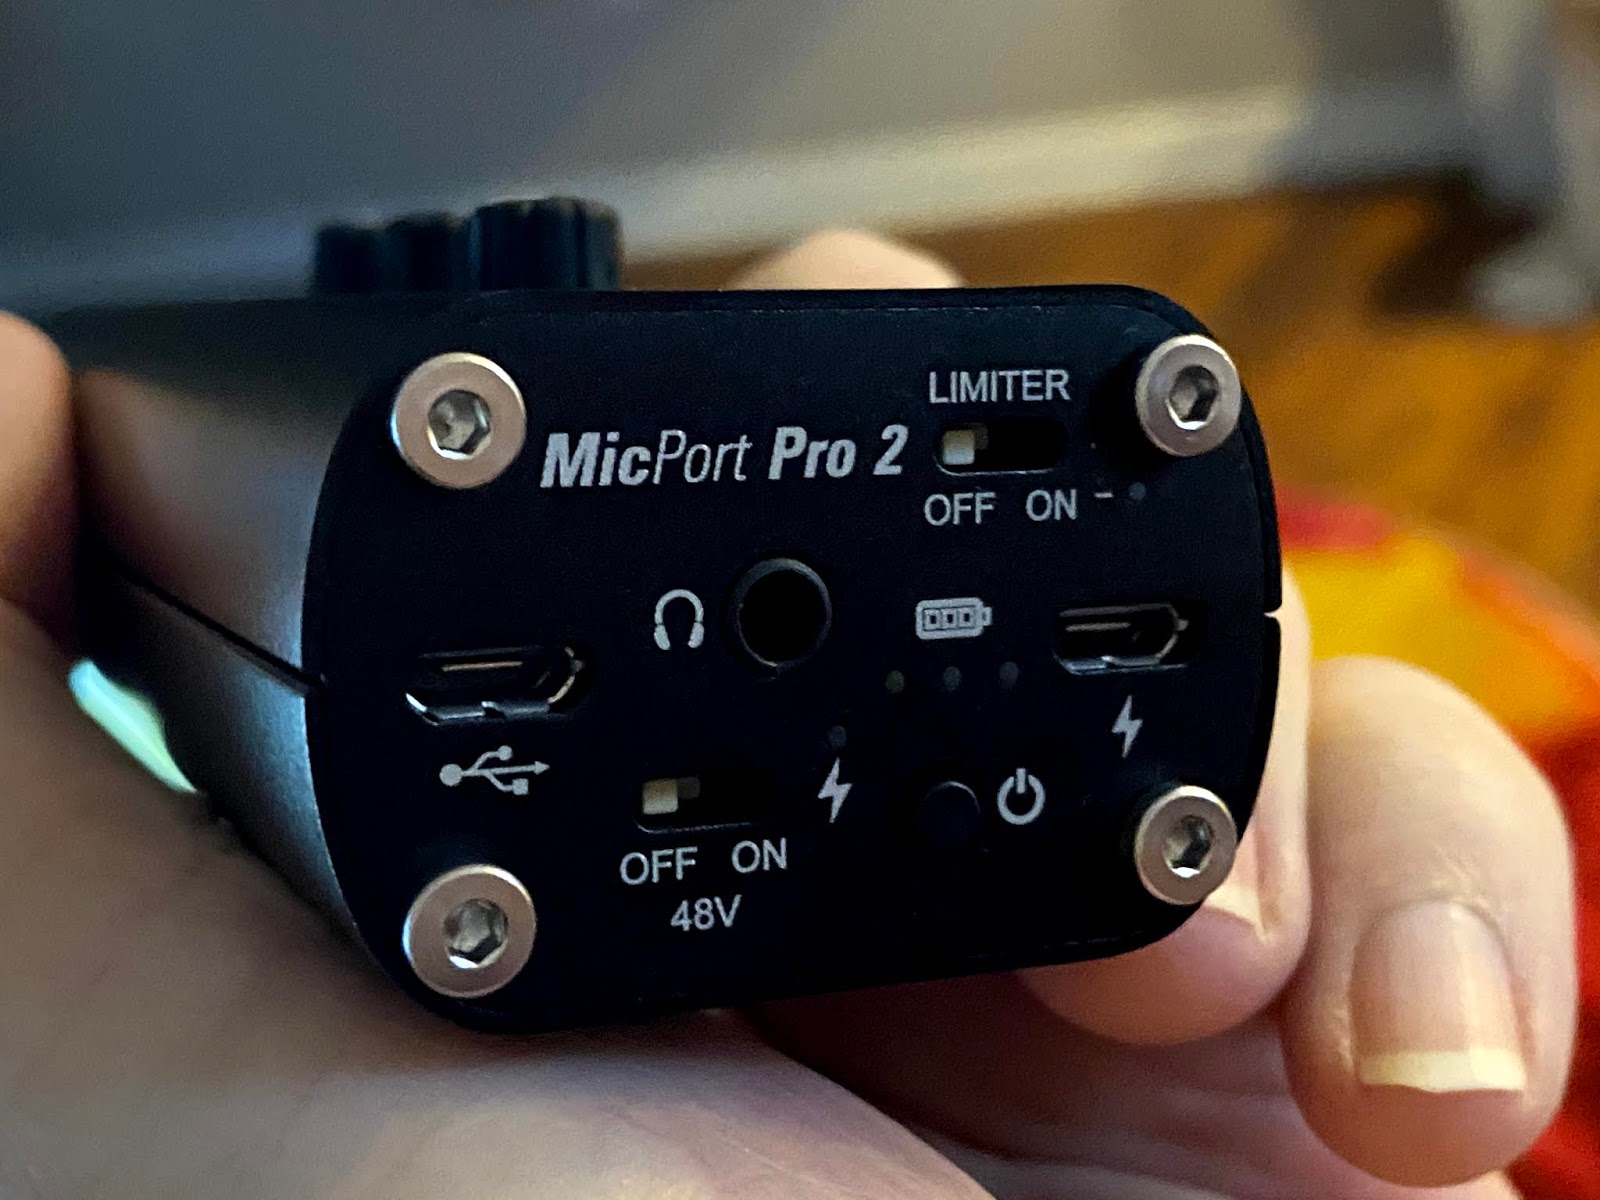
There's a lot going on on the bottom, so let's zoom in for a look. Under the MicPort Pro 2 logo are a USB port and a 1/8" stereo headphone jack. That LEFT USB port is for moving audio back and forth between the MicPort Pro and your recording device.
 |
| CEntrance MicPort Pro 2 Bottom Control Panel |
Moving to the right/top there's the LIMITER ON/OFF switch. If you tend to like to push the levels high as you can, this soft-knee limiter will save your butt. It's mostly engineered to keep the human voice from pushing too high and distorting. If you have talent with uneven, peaky voice levels, I'd use the LIMITER even knowing that the red Peak Flasher LED was set to -6 dB.
Under the LIMITER is a second USB port. Use this port to power the MicPort Pro 2 or to charge its battery. Battery? Yes an internal rechargeable battery that should last about 5 hours, less if you're using Phantom Power on a condenser mic like the Schoeps CMC641. (BTW, the Schoeps CMC641 is now available in Chroma Key Green!)
Phantom Power may also be needed to power some Electret Condenser microphones and a few of the newer Ribbon mics that need power for an onboard amp circuit. Bottom right is where you'll find the On/Off button. Press and hold. The LEDs next to the button will wink a few times during power up or power down. If the battery is fully charged, you see all three LEDs. They'll go out as the charge level goes down.
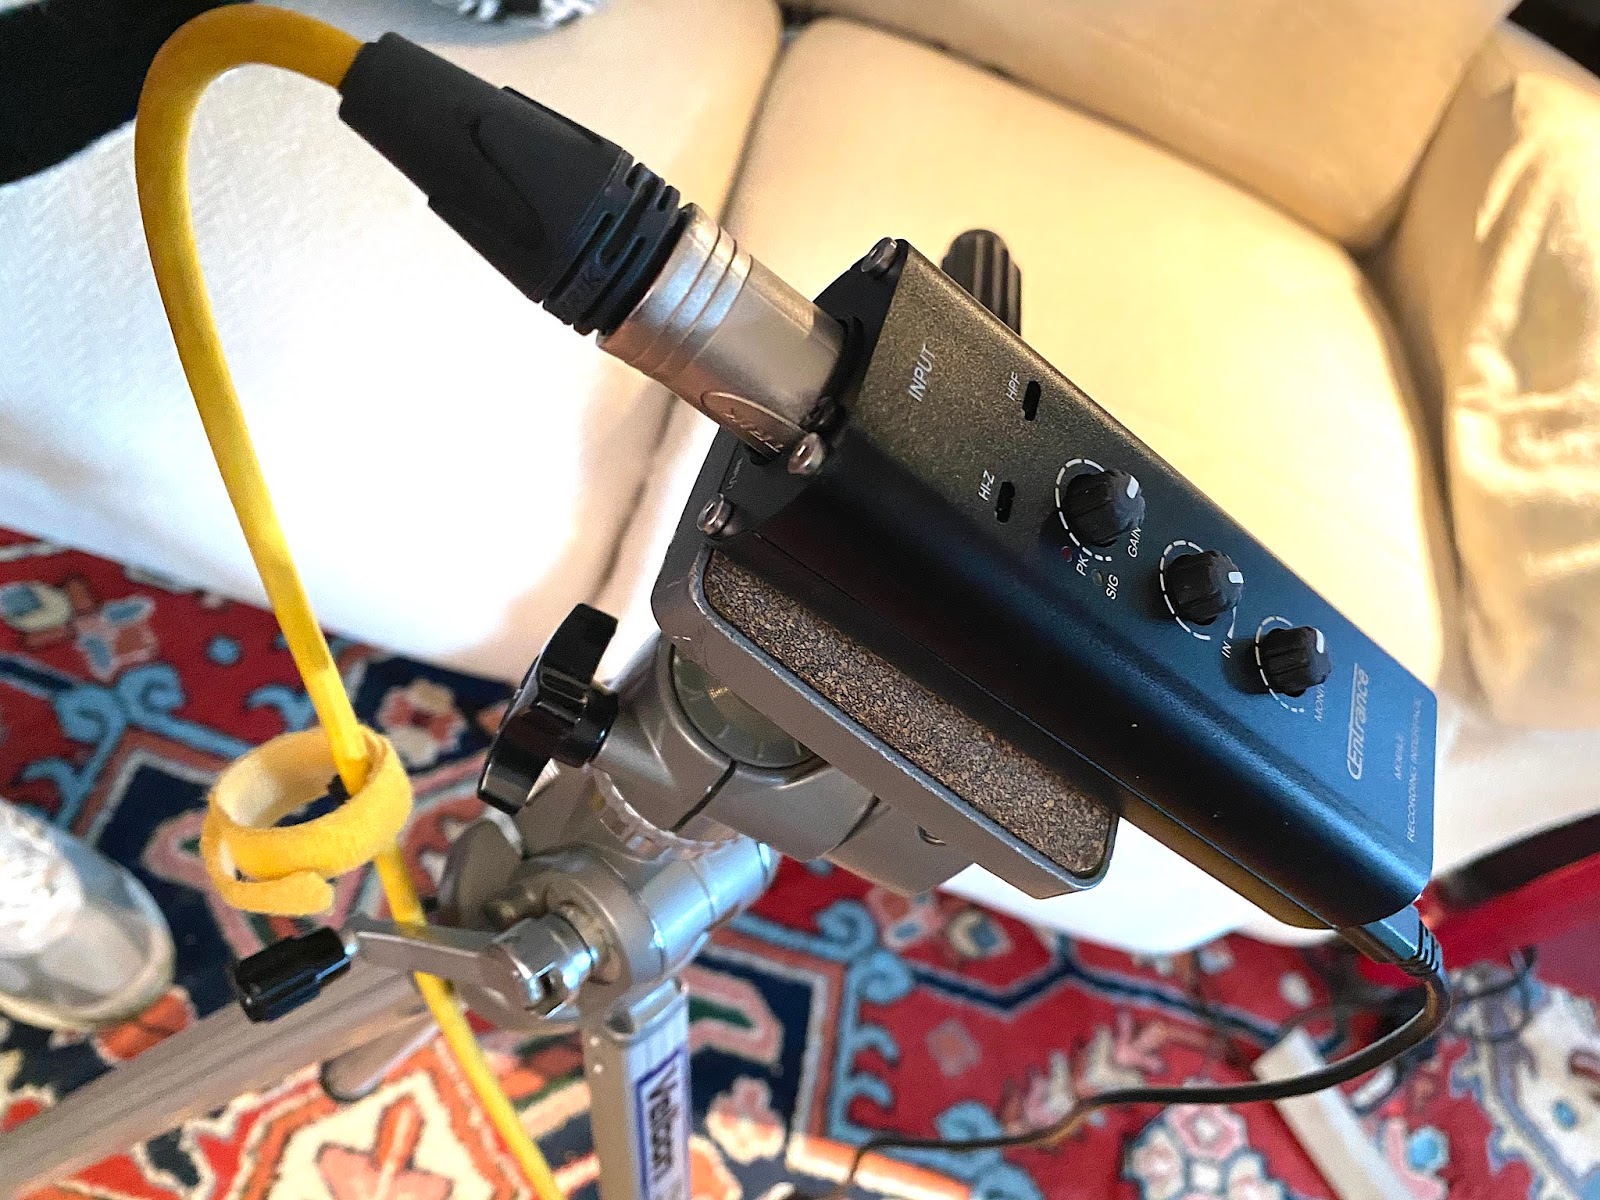
That's it, right? NO! CEntrance slyly put a threaded nut on the back side of the MicPort Pro so you can mount it on a camera stand or other device with a 1/4" - 20 mounting bolt. Why? As sturdy as it is, after plugging in a mic, a USB cable or two and headphones, MicPort Pro 2 can easily skitter in a lot of directions unless it's held in place. You may not have a camera tripod, but having something to keep the MicPort Pro 2 steady is a good idea.
 |
| CEntrance MicPort Pro 2 on Camera Tripod |
For some time now, audio gear makers have been finding ways to engineer in safe guards to keep inadvertant increases in input levels from going into distortion. CEntrance has done it three ways; with their -6 dB peak flasher, their on board LIMITER and by designing a two track USB output with one track 12 dB lower than the primary track. So if things go really crazy and you overdrive the Left Track, you've automatically got 12 dB of headroom to save your recording. Nice! While this makes the MicPort Pro 2 virtually unclippable, you can overdrive the Limiter and get some pretty gnarly audio, but you have to be very clueless to do that.
I like the sound of the preamp in the MicPort Pro 2. I'd characterize it as clean and quiet.
SPECS
If you're a tech, here are the specs for the MicPort Pro 2. With the Gain knob cranked all the back, the max input on the XLR connector is +5.8 dB V (+8.0 dB u). With the GAIN knob cranked back, the 1/4" balanced TRS input takes a whopping +27 dB V (+29.2 dB u). The maximum current for +48V is 10mA. I don't know a mic that uses that much current for Phantom Power. OK. Fine. Everything looks set? What's next?
Because I wanted to use the 512 GB of memory in my Apple iPhone 11 Pro Max, I had to find a way into it via its Lightning Connector. I had the Apple Lightning to USB Camera Adapter from a previously failed experiment. Although the description did NOT say anything about audio, it did say this,
“The Lightning to USB Camera Adapter supports standard photo formats, including JPEG and RAW, and SD and HD video formats, including H.264 and MPEG-4.”
That almost worked. I could hear my voice in the headphones during record, but I couldn't hear playback unless I unplugged the Lightning cable from the iPhone and listened to the iPhone speaker; an inelegant solution.
 |
| DO NOT USE THIS ADAPTER! |
 |
| Apple Lightning to USB 3 Adapter |
Instead, use the
Apple Lightning
to USB 3
Camera Adapter
shown on
the left
< -----here!
THIS ONE WORKS!!
The other one
DOES NOT WORK!
The specs for the Lightning to USB 3 Adaptor offered this, “Transfer your digital camera's photos and videos to your iPad with Apple's Lightning to USB 3.0 Type-A Camera Adapter. This adapter plugs directly into your iPad's Lightning port, providing a USB Type-A port for your camera's data cable. Your iPad will automatically open its Photos app so that you can choose which media to import. Additionally, various USB-based peripherals, including Ethernet adapters, audio interfaces, and card readers, can be connected through the USB port when the adapter is connected to power via its female Lightning Connector.
The Lightning to USB 3.0 Camera Adapter transfers data at USB 3.0 speeds on the 12.9" iPad Pro and at USB 2.0 speeds on other compatible iPads. It supports standard photo formats like JPEG and most RAW files as well as SD and HD video formats such as H.264 and MPEG-4. The adapter is compatible with all Lightning-enabled iPad models, including iPad mini.”
I used the short mini USB to Type A USB cable that came with the MicPort Pro 2 to exit the MicPort Pro 2 and plugged it into the Type A connector on the Apple Lightning to USB 3.0 Type A Camera Adapter.
I plugged the Lightning to USB 3.0 Camera Adapter into my iPhone. Immediately, a window opened and asked me if I wanted the Adapter to be updated. I clicked on "yes" and it was quickly done.
For Android users the CEntrance manual offers this: "For Android devices, an "OTG cable" or USB micro B to USB C cable is required. For Windows devices, download an ASIO driver from the CEntrance website."
Because my first effort would be to get audio in and out of my iPhone 11 Pro Max, I checked with CEntrance to see if they had a list of iOS apps that worked with MicPort Pro 2. Here it is.
Audio Evolution (iOS/Android)
I used the short mini USB to Type A USB cable that came with the MicPort Pro 2 to exit the MicPort Pro 2 and plugged it into the Type A connector on the Apple Lightning to USB 3.0 Type A Camera Adapter.
I plugged the Lightning to USB 3.0 Camera Adapter into my iPhone. Immediately, a window opened and asked me if I wanted the Adapter to be updated. I clicked on "yes" and it was quickly done.
For Android users the CEntrance manual offers this: "For Android devices, an "OTG cable" or USB micro B to USB C cable is required. For Windows devices, download an ASIO driver from the CEntrance website."
Because my first effort would be to get audio in and out of my iPhone 11 Pro Max, I checked with CEntrance to see if they had a list of iOS apps that worked with MicPort Pro 2. Here it is.
Audio Evolution (iOS/Android)
Auphonic (iOS -- Android Recorder)
Auria Pro (iOS)
BandLab (iOS/Android)
BeatMaker 3 (iOS)
Cubasis (iOS)
Field Recorder (Android/iOS)
FL Studio Mobile (iOS)
Garage Band (iOS)
Luci Live (iOS/Android)
N-Track (iOS/Android)
Tieline Report-IT (iOS/Android)
Some of these apps are pretty simple. A few are free. Others have a lot more going on. If you work in audio, you'd probably learn some things just by visiting these sites.
I had other iOS apps to try as well. Rode Reporter, for example. It's very simple. For my clients, I like simple. Unfortunately, Rode Reporter glitched the audio every time the iPhone screen got dimmer or brighter. I reached out to Rode and they thanked me for the info and suggested that die-hard Apple iPhone users can use the following work-around.
Go into the iPhone 11 Pro Max Settings > Displays & Brightness and set the Auto-Lock to NEVER. The main Rode Reporter Record window with the timer and meters stays lit and the audio doesn't glitch. By the time you read this, Rode may have already fixed the problem. At present, their software provides 48 kHz, but not 44.1 kHz. I suggested that they have both. The MicPort Pro 2 supports 24-bit, 192 kHz, btw. This is no bargain basement chip!
How do you get the recorded audio off the iPhone? One of my biggest pleasant surprises was Apple AirDrop. You can go to the recorded audio files on you iPhone, select one or more files, click on the small "arrow up" icon and if there's an Apple product that supports AirDrop close enough, the iPhone will see it. Touch the right AirDrop logo for that Apple device and BOOM the file is transferred. Most excellent!!
Auria Pro (iOS)
BandLab (iOS/Android)
BeatMaker 3 (iOS)
Cubasis (iOS)
Field Recorder (Android/iOS)
FL Studio Mobile (iOS)
Garage Band (iOS)
Luci Live (iOS/Android)
N-Track (iOS/Android)
Tieline Report-IT (iOS/Android)
Some of these apps are pretty simple. A few are free. Others have a lot more going on. If you work in audio, you'd probably learn some things just by visiting these sites.
I had other iOS apps to try as well. Rode Reporter, for example. It's very simple. For my clients, I like simple. Unfortunately, Rode Reporter glitched the audio every time the iPhone screen got dimmer or brighter. I reached out to Rode and they thanked me for the info and suggested that die-hard Apple iPhone users can use the following work-around.
Go into the iPhone 11 Pro Max Settings > Displays & Brightness and set the Auto-Lock to NEVER. The main Rode Reporter Record window with the timer and meters stays lit and the audio doesn't glitch. By the time you read this, Rode may have already fixed the problem. At present, their software provides 48 kHz, but not 44.1 kHz. I suggested that they have both. The MicPort Pro 2 supports 24-bit, 192 kHz, btw. This is no bargain basement chip!
How do you get the recorded audio off the iPhone? One of my biggest pleasant surprises was Apple AirDrop. You can go to the recorded audio files on you iPhone, select one or more files, click on the small "arrow up" icon and if there's an Apple product that supports AirDrop close enough, the iPhone will see it. Touch the right AirDrop logo for that Apple device and BOOM the file is transferred. Most excellent!!
Further Into iPhone
Trying to use Garage Band for iPhone was a miserable experience. Maybe if you’re an ADD gamer and have multiple thumb twitch disorder the app will appeal to you. For me, it was just a jumble of things and no fun at all. The regular version of Garage Band, for your desktop or MacBook Pro is different, and a lot easier.
After a bit of looking around I found Auphonic. It looked free and seemed to be able to do the job. The specs even mentioned that it records 24-bit wav .caf files. Just like the QuickTime .mov container, a .caf container can contain many different audio formats, metadata tracks, and data. It is not limited to a 4 GB file size and a single .caf file can theoretically save hundreds of years of recorded audio due to its use of 64-bit file offsets.
GarageBand, Soundtrack Pro, and Logic Studio use the .caf format for their loop and sound effects library. I’m pretty sure my iPhone 11Pro Max doesn’t run Quicktime as most of us (me included) know it, but OK. Not being limited to a 4 GB file size is also a plus. But, would MicPort Pro 2 work with the Auphonic iPhone app?
Trying to use Garage Band for iPhone was a miserable experience. Maybe if you’re an ADD gamer and have multiple thumb twitch disorder the app will appeal to you. For me, it was just a jumble of things and no fun at all. The regular version of Garage Band, for your desktop or MacBook Pro is different, and a lot easier.
After a bit of looking around I found Auphonic. It looked free and seemed to be able to do the job. The specs even mentioned that it records 24-bit wav .caf files. Just like the QuickTime .mov container, a .caf container can contain many different audio formats, metadata tracks, and data. It is not limited to a 4 GB file size and a single .caf file can theoretically save hundreds of years of recorded audio due to its use of 64-bit file offsets.
GarageBand, Soundtrack Pro, and Logic Studio use the .caf format for their loop and sound effects library. I’m pretty sure my iPhone 11Pro Max doesn’t run Quicktime as most of us (me included) know it, but OK. Not being limited to a 4 GB file size is also a plus. But, would MicPort Pro 2 work with the Auphonic iPhone app?
YES! There’s an orange gear wheel in the upper right corner of the Auphonic screen that allows you to configure the recorder. I could choose from among the three iPhone mics or the CEntrance MPP 2. It also provided for Format (AAC or PCM), Sample Rate (Default, 44.1 or 48), Channels (Default or mono), Precision, (24-bit or 16-bit) Input Gain (-12, -24, -36) and Headphone/USB Monitoring adjustments. After making my selections and hitting “Done” in the upper right-hand corner, I began hearing something weird in the headphones.
Oh, right, MPP 2 passes two channels. One is the main and the other is -12. When I set the iPhone down and it went dark, the audio returned to dual mono mod, but didn't glitch as the Rode Broadcaster software did. When I picked the iPhone back up again and swiped to return to Auphonic, the split track was again obvious. Turning the Input_USB knob on the MPP2 fully counter clockwise allowed me to hear only the input and that was less distracting.
Oh, right, MPP 2 passes two channels. One is the main and the other is -12. When I set the iPhone down and it went dark, the audio returned to dual mono mod, but didn't glitch as the Rode Broadcaster software did. When I picked the iPhone back up again and swiped to return to Auphonic, the split track was again obvious. Turning the Input_USB knob on the MPP2 fully counter clockwise allowed me to hear only the input and that was less distracting.
The Chapters feature is also a nice touch. There’s an image labelled “Add Chapter” just below the digital time readout that allows you to add chapter markers as you go. That may be helpful to mark different takes. You can also click on the current chapter and change its name or remove it. Cool! Any level above -12 causes the record level meters to show red.
Nice! Then, not so nice. With Auphonic, you need to log in and create an account. After that your productions are uploaded to their servers and you pay as you go. There are six levels of membership. With "Free" you get up to two hours per month. 100 hours a month (Auphonic XL) is only $89 USD. Auphonic does have some nice features, but not today, thanks!
Nice! Then, not so nice. With Auphonic, you need to log in and create an account. After that your productions are uploaded to their servers and you pay as you go. There are six levels of membership. With "Free" you get up to two hours per month. 100 hours a month (Auphonic XL) is only $89 USD. Auphonic does have some nice features, but not today, thanks!
TWISTED WAVE
Twisted Wave’s free version went well. Their "export by email link" export feature is pretty cool. It uploads your recorded file to Twisted Wave servers and sends a link to an email address. I quickly received an email with a link. Clicking on the link resulted in me getting a page from which I could either play the audio directly from their web site or download it. I downloaded the file and pulled it into Pro Tools 11. There was one very small tick about 1:19 into the clip, but not as bad as with the Rode Reporter software.
GARAGE BAND (not iOS)
I connected my Neumann TLM 103 to the MicPort Pro 2 and connected the MicPort Pro 2 to my Mac tower via a long USB 2.0 Repeater Cable. I opened a session in Garage Band ’11 (6.0.5), went to the Garage Band Preferences panel, chose Mic Port Pro for both input and output. Below that was a box to click on that offers, “I want to hear my instrument as I play and record.” I chose it and clicked on “Create.”
I added new stereo track by going to the Garage Band Track tab and clicking on New Track. I was presented with the choice of Software Instrument, Audio Microphone or Audio Instrument and Drummer. With the “Details” drop down menu I could choose Input 1, Input 2 or Input 1+2 or none. Although I was after a mono voice track, I chose Input 1+2 to allow me to record both the main and the -12 dB track.
Instantly I heard the mic in my left ear. I swung the IN_USB knob on the MicPort Pro 2 from full clockwise to the center and heard myself in both ears with a slight delay due to the trip through the MicPort Pro 2. Then I clicked on the small orange icon on the Garage band track panel to disable throughput and heard myself from the MicPort Pro 2 input without the latency.
I set the gain knob on the MicPort Pro 2 so that the TLM 103 was just barely lighting up the red LED flasher. That level showed lower on Garage Band's metering, but I remembered that the MicPort Pro 2 flasher fires at -6 dB. I readjusted the MPP 2 headphone output to my liking and hit the red record button on the Garage Band transport and recorded a voice track.
I got a good take, but while I was recording, the waveform levels in Garage Band indicated that both left and right tracks were the same level. When I hit the Mac keyboard space bar to stop recording, the wave forms instantly showed the 12 dB level differences. I hit return on the Mac keyboard and hit the keyboard space bar again to hear playback. I was still hearing my live mic in my headphones as well as playback until I turned the IN_USB knob on the MicPort Pro 2 full clockwise.
After recording a two and a half minute track and making sure it had no glitches, I then set about to export it so that I could bring it into Pro Tools on the same desktop computer. Under the Garage Band “Share” tab, I could Send Song to iTunes, Send Ringtone to iTunes, Send podcast to iWeb, Export Song to Disk and Burn song to CD. I chose Export Song to Disk. I was offered the choice of compressing the file or leaving it in its original quality. I chose NOT to compress and clicked on EXPORT. A window popped up allowing me to name the file and export it to anywhere on my computer. It also indicated that the file was an .AIF file. No big deal today, but I thought I was going to get a .WAV file.
PRO TOOLS
Importing into Pro Tools 11 was a snap with the two track file on the timeline, no glitches and all good! For a section of one file, I purposely drove the Input GAIN knob so the left channel was in the red. I used the LIMITER. You can hear what that does to the audio on my test files.
Apple Logic Pro, both on my Mac Book Pro and Studio Mac worked well, but how about Pro Tools? I've been using Pro Tools for over 15 years. It's still my "go-to" app for audio. With Pro Tools, there’s another principal at work.
Companies like Avid/Digidesign/Pro Tools, until recently, operated with a very closed system. In other words, you needed Pro Tools software running on a computer that was attached to Pro Tools hardware. Anything else just wouldn’t work or wouldn't work very well. While parts of their libertarian user base complained about the approach, I understood why Pro Tools wanted to limit access to third-party hardware, but without all of that proprietary handshaking, what would happen if I tried to connect MicPort Pro 2 to Pro Tools 11?
I did learn one new trick. To get Pro Tools to see the MicPort Pro 2, I needed to press the "n" key on the computer keyboard when starting Pro Tools 11. This brought up a window that let me choose different I/Os. I had already connected the MicPort Pro 2 to the Mac tower via the long USB 2.0 powered cable. Pro Tools saw the MicPort Pro 2 and after I chose it, a production started up after a screen that informed me that things were different than when using my DIGI003R.
I added a stereo input track, selected MicPort Pro 2 for a input, clicked on the record ready button and it worked just fine. No problems. I was actually a little surprised that it was that easy. I have that file, using the Neumann TLM 103, the MicPort Pro 2 and Pro Tools 11 on my DeskTop Mac.
I added a stereo input track, selected MicPort Pro 2 for a input, clicked on the record ready button and it worked just fine. No problems. I was actually a little surprised that it was that easy. I have that file, using the Neumann TLM 103, the MicPort Pro 2 and Pro Tools 11 on my DeskTop Mac.
I have WAV file samples using a TLM 103, an AEA R84 ribbon mic and an original Sennheiser MD421 dynamic mic. You can hear what happens when I insert the LIMITER and HPF.
Here's a link to a playlist of MicPort Pro 2 files using TLM 103, Sennheiser MD 421, Shure SM58 and AEA R84 mics, softwares, three different recording softwares on three different devices.
The MicPort Pro 2 Manual is right here in case you ever need it.
Here's a link to a playlist of MicPort Pro 2 files using TLM 103, Sennheiser MD 421, Shure SM58 and AEA R84 mics, softwares, three different recording softwares on three different devices.
The MicPort Pro 2 Manual is right here in case you ever need it.
IN CONCLUSION
The CEntrance MicPort Pro 2's heft tells me that it's a solid piece of gear. It has a lot of well thought out features. Yes, there are cheaper devices that sort of do what it does, but there's usually something missing at the lower price points. It's a mic or line level device. You can run it on its rechargeable batteries, although you can also power it from the USB port on the right.
BONUS INFO
BONUS INFO
I go back to my original thought. With enough memory in your iPhone (and memory is cheap these days) you can have your own quiet little studio set up. No spinning drives or fans.
People have a tendency not to think about the importance of having a proper acoustical environment. I want my clients to feel confident about their work. It's a two-parter; no noise from the outside and no reflections inside. I have my clients send me a short WAV file of their best effort, so I can hear what they're doing. If I can hear the room, or the neighbor's dog or lawn mower, we have to come up with solutions.
People have a tendency not to think about the importance of having a proper acoustical environment. I want my clients to feel confident about their work. It's a two-parter; no noise from the outside and no reflections inside. I have my clients send me a short WAV file of their best effort, so I can hear what they're doing. If I can hear the room, or the neighbor's dog or lawn mower, we have to come up with solutions.
Technique, Inc. © 2020 All Rights Reserved
Contact Ty Ford at; www.tyford.com
Contact Ty Ford at; www.tyford.com
NOTE: I am honored to say that I have an Affiliate Relationship with B&H Photo/Audio/Video. If you buy something from them after clicking on one of my links, I am paid a small commission. Not much, but it helps to keep the lights on.